

Yourself
A Guide to Great Embouchure...
FLUTE
Embouchure Formation
-
Using Just the Head Joint
-
Remember to have good Posture and Air Support.
-
Corners should be pulled firm, like you are saying “Wee”
-
Then push the corners down like you are saying the word “too”.
-
You can also think of the word "Pooh".
-
Imagine you are spitting out a watermelon seed.
-
-
Bring the embouchure plate to the lips so that plate sits in the crook of the chin, the “soul patch” zone.
-
You should feel your bottom lip on the embouchure hole and have 1/4 to 1/3 of the hole covered.
-
Again check that you are saying the words “Wee” to form the corners and “too” as you blow air out.
-
Proper embouchure formation should look like oval that is small and flat. (Watermelon seed)
-
Blow air into the embouchure hole against the back wall cutting some of the air on the outer edge of the embouchure hole.
-
Click on the SEE YOUR EMBOUCHURE button to check your embouchure.
-
Watch the Video for this formation in action.

When the embouchure is incorrectly formed, you can hear some distinct sounds. Click on the buttons here to see causes and solutions to common embouchure formation problems. You can also compare your sound to the listening examples next to the buttons.
Embouchure Issues AND Solutions
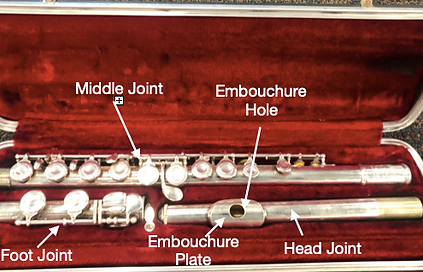
Assembling The Flute
-
Familiarize yourself with the different parts of the flute.
-
Put the head joint on to the main body by gently twisting it as you push it in.
-
Make sure that the outer edge of the embouchure hole lines up with the center of the keys on the main body.
-
-
Put the foot joint on the main body of the flute by gently twisting as you put it on.
-
Make sure that the key rod on the foot joint lines up with the center of the last key on the main body.
-
-
As you assemble, try not to squeeze the rods and keys too hard as this will bend them.
Holding the Flute
-
Sit towards the front of the chair with your body balanced over your sit bones.
-
Do not lean too far forward or back as this will create tension in your back and your abdominal muscles respectively.
-
-
Your back should be straight and tall with legs out in front of you with either your feet flat on the floor or slightly tucked under your body ensuring that your chest and abdomen have enough room to expand without creating tension.
-
When holding the flute, your left hand will be closest to your head and the right hand further down.
-
The left hand will have the palm facing you and the right hand the palm is facing away.
-
Think you are eating a sandwich with your left hand.
-
Think you are giving a sandwich with your right hand.
-
-
Your fingers should be slightly curled to touch each of the keys. The Left hand should be turned slightly so that the flute sits at the base of the left index finger.
-
When you lift the flute into position, the flute should be parallel to the ground with the embouchure hole centered on your lips.
-
There are 3 anchor points that will hold the flute in place:
-
The base of your left index finger.
-
Your right thumb
-
The embouchure plate against the lower lip.
-
-
The flute should be centered on your embouchure and slightly forward with your head slightly turned to your left. (20˚ or 30˚ )
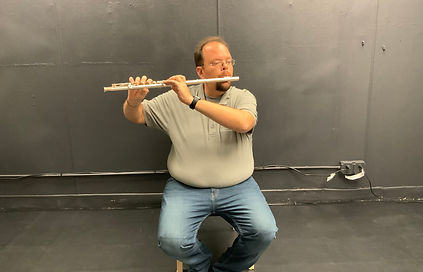
Front View

Side View